DC Fast Charger Installation & User Guide
Your complete DC fast charger installation guide — from setup and safety checks to daily maintenance and troubleshooting tips.
Your complete DC fast charger installation guide — from setup and safety checks to daily maintenance and troubleshooting tips.
Installing a DC fast charger at home isn’t complicated—but it does require precision, care, and a clear understanding of each step. Whether you’re setting up your first home EV charging station or maintaining an existing one, this guide walks you through everything you need to know—from installation checklists to troubleshooting and long-term maintenance.
Before starting, check that all components are included in the package (refer to the packing list for confirmation):
Confirm that all parts are intact and match the packing list before proceeding with the installation.
This DC EV charger is designed for outdoor use. Make sure the installation site meets the following conditions to ensure reliable performance and longer service life:
Avoid extreme humidity, flooding areas, or direct sunlight exposure when possible. Proper placement is key to safe and efficient operation.
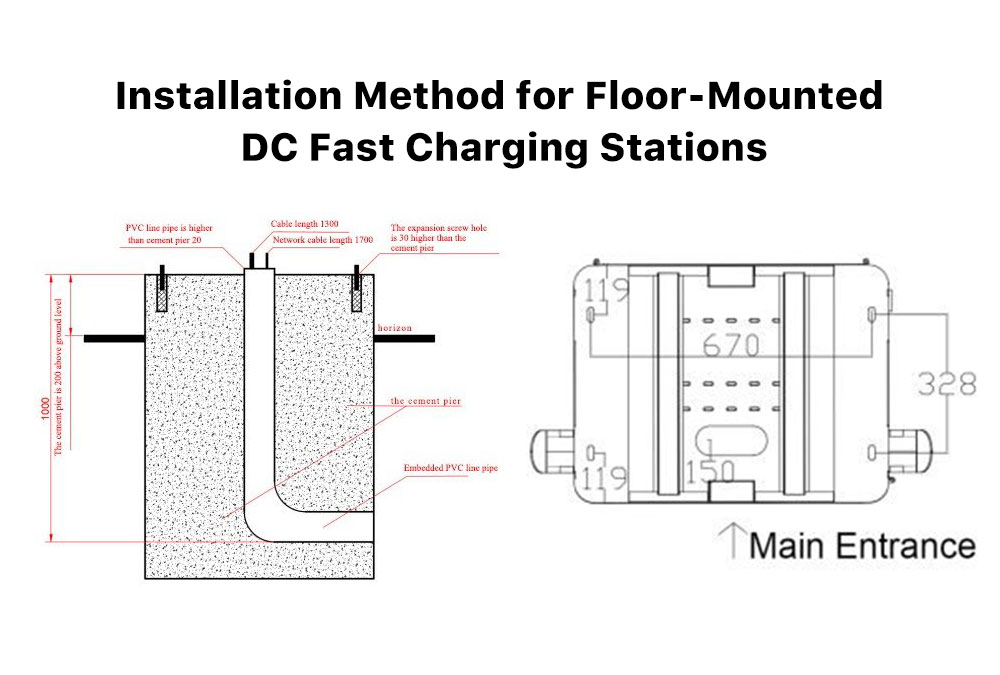
The unit supports vertical, floor-mounted installation.
Please refer to Figures 1 and 2 in the product manual for detailed dimensions and installation positions.
Even the best EV charging systems may face technical hiccups. Here’s how to handle the most common issues safely and effectively.
| No. | Common Issue | Solution |
|---|---|---|
| 1 | Circuit breaker damage | Replace the breaker immediately to restore electrical safety. |
| 2 | Data acquisition board failure | Contact the manufacturer for replacement. Avoid disassembling it yourself to prevent secondary damage. |
| 3 | Charger module failure | Replace the faulty module to restore system stability. |
| 4 | System error reports | Could be caused by module or data board faults. Contact the manufacturer for full diagnostics. |
| 5 | Platform not connecting to the internet | Restart the charger, wait for it to power down, and allow the gun to unlock automatically. If it still doesn’t release, contact customer service for assistance. |
| 6 | Current meter doesn’t display charging current | Check network cables and connections. If the communication board is damaged, it will need replacement. |
| 7 | AC undervoltage | Verify wiring and switches in the power distribution cabinet for any faults. |
| 8 | Energy meter displays zero | Unplug and reconnect the data cable. If the issue persists, replace the monitoring board. |
| 9 | Card lock issue | Always complete payment after charging. If your card gets locked, reinsert it into the same charger to unlock. |
| 10 | Charging interruption | Ensure your IC card balance is sufficient before charging. Low balance may cause charging to stop automatically. |
Each charger module has three indicator lights to show its operating status:
| Indicator Light | Normal Status | Fault Status | Fault Description |
|---|---|---|---|
| Fault Description
(Green) |
On | Off | No input voltage; the module cannot operate. |
| Protection Indicator
(Yellow) |
Off | On | Overvoltage, undervoltage, overtemperature, or communication failure. |
| Off | On | Manual mode enabled. | |
| Fault Indicator (Red) | Off | On | Output overvoltage, address conflict, or severe current imbalance. |
| Off | Flashing | Fan failure detected. | |
Understanding these lights helps you spot potential issues before they affect performance.
To ensure your home DC EV charger runs smoothly for years, follow these maintenance recommendations:
Weather protection:
Install a small canopy or roof if outdoors to protect against rain and sun.
Monthly inspection:
Check all bolts, cables, and connectors to prevent loose connections or short circuits.
Lightning protection:
Make sure the charger is properly grounded to reduce risk during storms.
Operate within rated limits:
Avoid overloading. Keep voltage and current within specified ranges to extend lifespan.
Cable care:
After charging, coil the cable neatly and store it properly to prevent damage.
Following these steps will help maintain both safety and performance in your DC fast charging system.
Proper handling ensures your EV charger arrives safely and ready for installation.
Secure packaging:
Use sturdy materials, label the box clearly, and never store or transport the unit upside down.
Reinforcement:
Add padding to prevent vibration or impact damage during transit.
Professional handling:
Always have trained technicians handle transportation and installation.
At AnengJi, we design our chargers to be robust, efficient, and user-friendly. This DC fast charger installation guide is here to help you set up, use, and maintain your equipment with confidence.
Our goal is simple—to make EV ownership easier and greener for everyone.
If you ever need technical support, spare parts, or customized service, our team is just a message away.
How do I install a DC fast charger at home?
Hire a certified electrician familiar with EVSE installation requirements. They’ll connect your charger to a dedicated power supply and ensure it meets local safety standards.
What’s the recommended maintenance schedule for a home EV charger?
Inspect connections and bolts monthly, check for corrosion, and clean the unit regularly to prevent buildup of dust or moisture.
What should I do if my charger shows a red fault light?
A red light usually means overvoltage, current imbalance, or a fan failure. Stop charging immediately and contact your service provider.
Can I use my DC fast charger outdoors?
Yes, as long as it has at least an IP54 protection rating and is installed with proper weather shielding.
Why is my EV charger display showing zero or not responding?
It may be a communication board or monitoring module fault. Try resetting the cable connection first, and if that fails, contact your charger manufacturer.
![]()
As a leading Chinese manufacturer of EV charging systems and Commercial & Industrial (C&I) Energy Storage, Anengji provides a full range of AC/DC chargers and modular BESS for fleets, hospitality, OEMs, government agencies, hospitals, and commercial parking. With a robust footprint across North America, Southeast Asia, Central Asia, and Russia, we empower global clients with high-reliability, intelligent energy infrastructure to accelerate efficiency and the green energy transition.